4 - Dubbo x Spring XML to develop microservice applications
Target
Develop Dubbo x Spring XML-based microservice development from scratch, and understand the Dubbo x Spring XML configuration method.
Difficulty
Low
Environmental requirements
System: Windows, Linux, MacOS
JDK 8 and above (JDK17 is recommended)
Git
IntelliJ IDEA (optional)
Docker (optional)
Rapid deployment (directly started based on Samples)
This chapter will teach you step by step how to deploy and run a Dubbo x Spring XML-based use case through a few simple commands.
Note: The details of the code deployed in this chapter can be found in 1-basic/dubbo-samples-spring-xml in the repository of apache/dubbo-samples, It will also be explained in the next chapter.
1. Get the test project
Before starting the whole tutorial, we need to get the code of the test project. All test case codes of Dubbo are stored in the repository apache/dubbo-samples, the following command can help you get all the codes in the Samples repository.
git clone --depth=1 --branch master git@github.com:apache/dubbo-samples.git
2. Start a simple registration center
For a microservice application, the registry is an indispensable component. Only through the registration center, the consumer can successfully discover the address information of the server, and then make a call.
To make this tutorial easier to use, we provide a simple starter based on the Apache Zookeeper registry. If you need to deploy the registry in a production environment, please refer to Production Environment Initialization to deploy a highly available registry.
Windows:
./mvnw.cmd clean compile exec:java -pl tools/embedded-zookeeper

Linux / MacOS:
./mvnw clean compile exec:java -pl tools/embedded-zookeeper

Docker:
docker run --name some-zookeeper -p 2181:2181 --restart always -d zookeeper
3. Start the service provider
After starting the registry, the next step is to start a service provider that provides services externally. Corresponding samples are also provided in dubbo-samples, which can be quickly pulled up by the following command.
Windows:
./mvnw.cmd clean compile exec:java -pl 1-basic/dubbo-samples-spring-xml "-Dexec.mainClass=org.apache.dubbo.samples.provider.Application"

Linux / MacOS:
./mvnw clean compile exec:java -pl 1-basic/dubbo-samples-spring-xml -Dexec.mainClass="org.apache.dubbo.samples.provider.Application"

Note: You need to open an independent terminal to run, and the command will keep executing.
After executing the above command, wait for a while for the following log to appear (Dubbo Application[1.1](demo-provider) is ready.), which means that the service provider has started, indicating that the service provider can provide served.
[08/02/23 03:26:52:052 CST] org.apache.dubbo.samples.provider.Application.main() INFO metadata.ConfigurableMetadataServiceExporter: [DUBBO] The MetadataService exports urls : [dubbo://30.221. 128.96:20880/org.apache.dubbo.metadata.MetadataService?anyhost=true&application=demo-provider&background=false&bind.ip=30.221.128.96&bind.port=20880&connections=1&corethreads=2&delay=true0&deprecated=false&dubbo=10ync=0genic=0genic=0&exeted =false&getAndListenInstanceMetadata.1.callback=true&getAndListenInstanceMetadata.return=true&getAndListenInstanceMetadata.sent=true&group=demo-provider&interface=org.apache.dubbo.metadata.MetadataService&ipv6=fd00:1:5:5200:4d53:9f5:a545:804d&methods=exportInstanceMetadata,getAndListenInstanceMetadata , getExportedServiceURLs, getExportedURLs, getExportedURLs, getExportedURLs, getExportedURLs, getExportedURLs, getInstanceMetadataChangedListenerMap, getMetadataInfo, getMetadataInfos, getMetadataURL, getServiceDefinition, getServiceDefinition, getSubscribedURLs, isMetadata aService,serviceName,toSortedStrings,toSortedStrings,version&pid=70803®ister=false&release=3.1.6&revision=3.1.6&side=provider&threadpool=cached&threads=100×tamp=1675841212727&version=1.0.0], dubbo version: 3.1.23host: 6
[08/02/23 03:26:52:052 CST] org.apache.dubbo.samples.provider.Application.main() INFO metadata.ServiceInstanceMetadataUtils: [DUBBO] Start registering instance address to registry., dubbo version: 3.1 .6, current host: 30.221.128.96
[08/02/23 03:26:52:052 CST] org.apache.dubbo.samples.provider.Application.main() INFO metadata.MetadataInfo: [DUBBO] metadata revision changed: null -> 602d44cc6d653b9cd42ab23c3948b5ab, app: demo -provider, services: 1, dubbo version: 3.1.6, current host: 30.221.128.96
[08/02/23 03:26:52:052 CST] org.apache.dubbo.samples.provider.Application.main() INFO deploy.DefaultApplicationDeployer: [DUBBO] Dubbo Application[1.1](demo-provider) is ready ., dubbo version: 3.1.6, current host: 30.221.128.96
4. Start service consumer
The last step is to start a service consumer to call the service provider, which is the core of the RPC call, providing a bridge for the service consumer to call the service provider.
Windows:
./mvnw.cmd clean compile exec:java -pl 1-basic/dubbo-samples-spring-xml "-Dexec.mainClass=org.apache.dubbo.samples.client.Application"

Linux / MacOS:
./mvnw clean compile exec:java -pl 1-basic/dubbo-samples-spring-xml -Dexec.mainClass="org.apache.dubbo.samples.client.Application"
After executing the above command, wait for a while for the following log (hi, dubbo) to appear. The printed data is returned by the service provider after processing, marking the success of a service call.
[08/02/23 03:28:23:023 CST] org.apache.dubbo.samples.client.Application.main() INFO deploy.DefaultApplicationDeployer: [DUBBO] Dubbo Application[1.1](demo-consumer) is ready ., dubbo version: 3.1.6, current host: 30.221.128.96
Receive result ======> hi, dubbo
Hands-on practice (from zero code development version)
This chapter will teach you how to develop a microservice application from scratch through step-by-step tutorials.
1. Start the registration center
For a microservice application, the registry is an indispensable component. Only through the registration center, the consumer can successfully discover the address information of the server, and then make a call.
To make this tutorial easier to use, we provide a simple starter based on the Apache Zookeeper registry. If you need to deploy the registry in a production environment, please refer to Production Environment Initialization to deploy a highly available registry.
Windows:
git clone --depth=1 --branch master git@github.com:apache/dubbo-samples.git
cd dubbo-samples
./mvnw.cmd clean compile exec:java -pl tools/embedded-zookeeper

Linux / MacOS:
git clone --depth=1 --branch master git@github.com:apache/dubbo-samples.git
cd dubbo-samples
./mvnw clean compile exec:java -pl tools/embedded-zookeeper

Docker:
docker run --name some-zookeeper -p 2181:2181 --restart always -d zookeeper
2. Initialize the project
Starting from this section, the project will be built and tested based on IntelliJ IDEA.
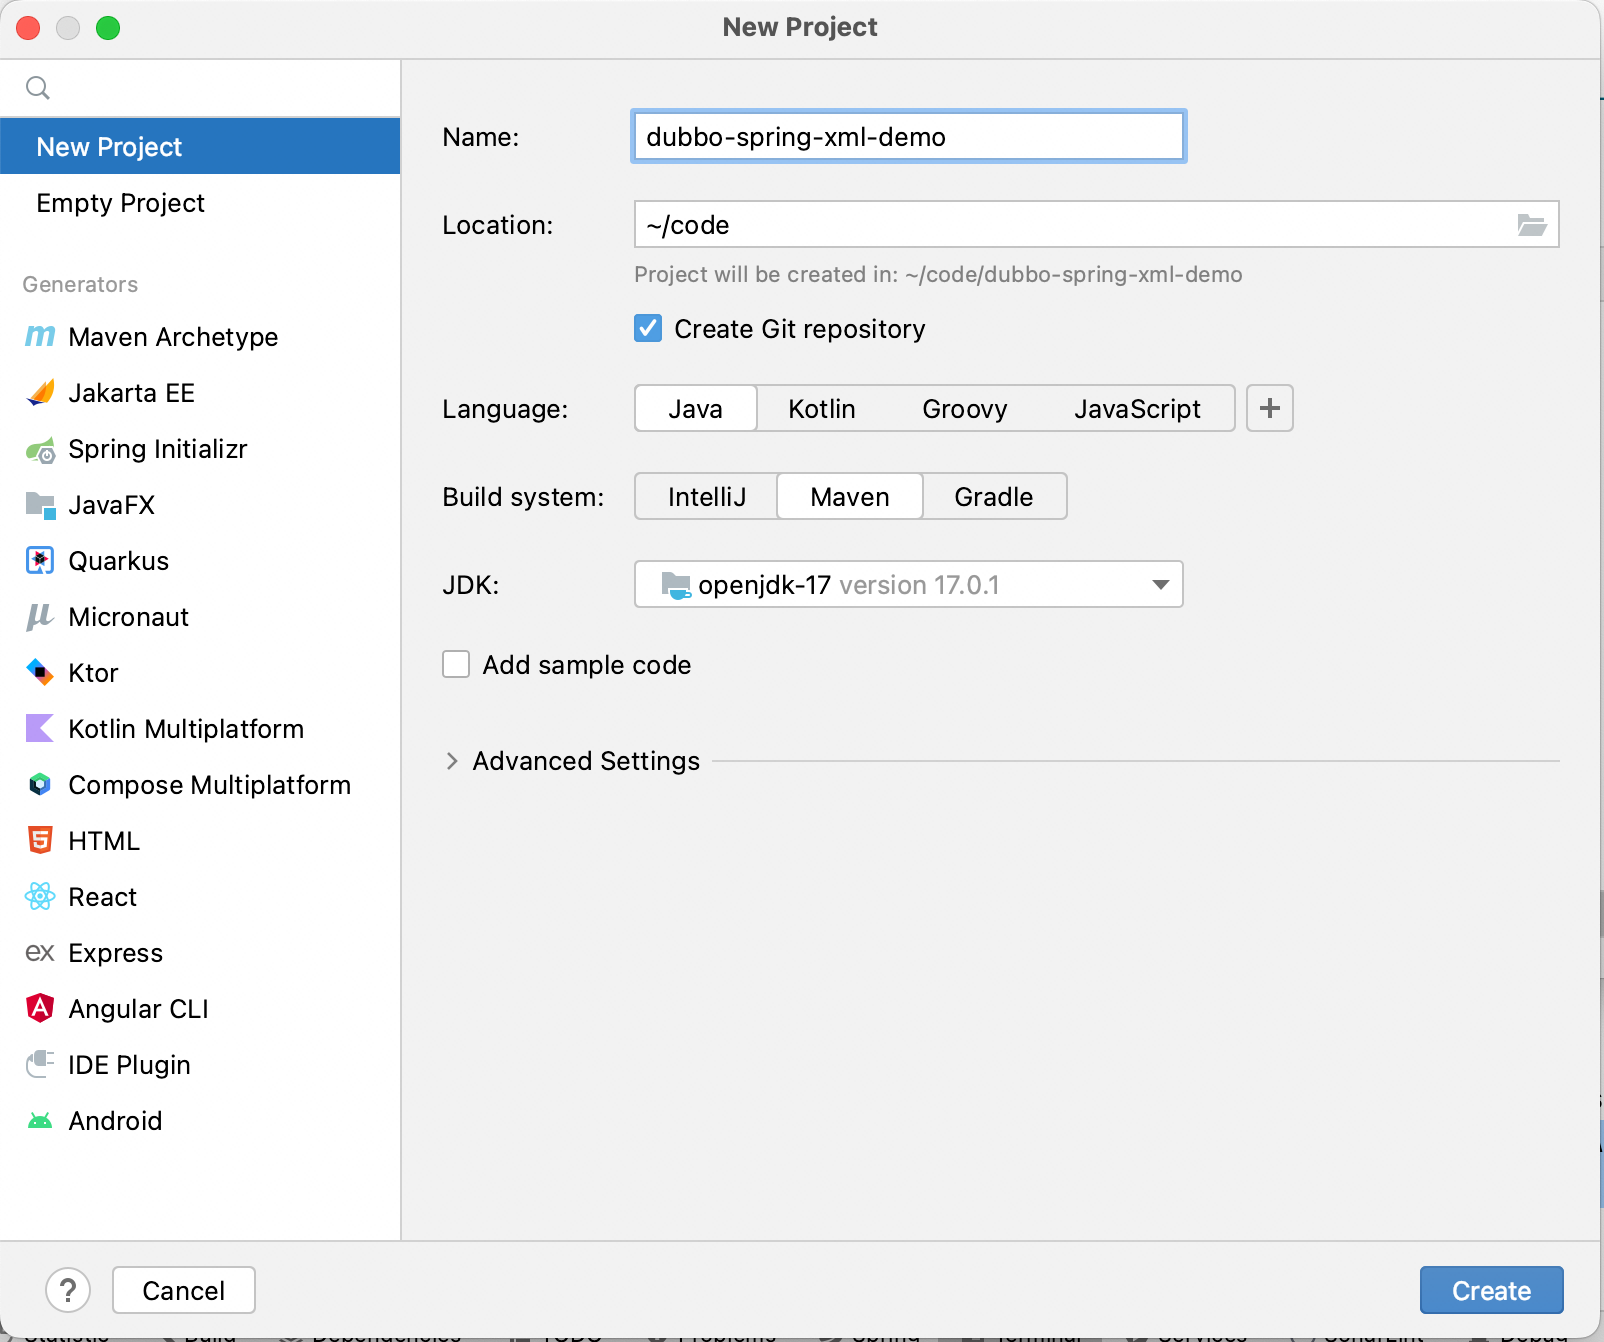
As shown above, a basic project can be built.
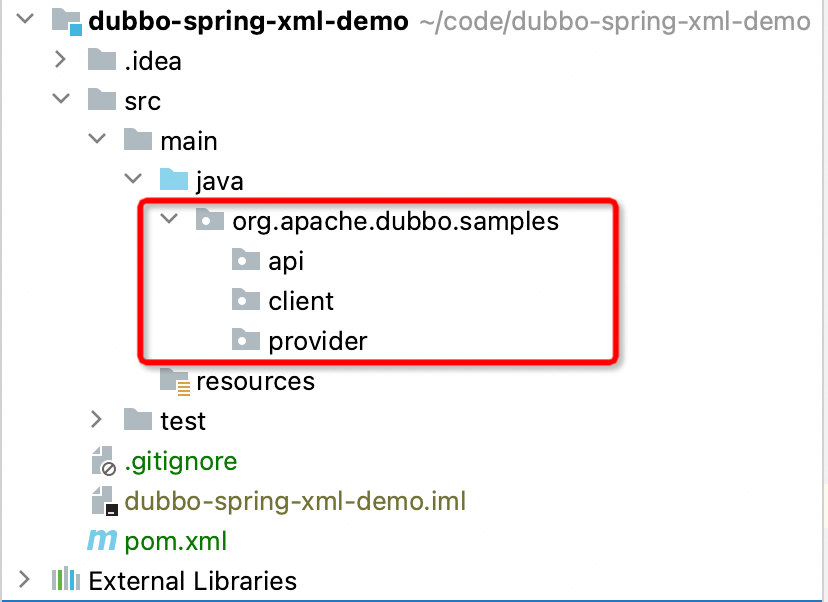
After initializing the project, you need to create org.apache.dubbo.samples.api, org.apache.dubbo.samples.client and org.apache.dubbo.samples in the src/main/java directory .provider` three packages.
In the future, we will create the corresponding interface under api, create the corresponding client subscription service function under client, and create the corresponding server implementation and publish service function under provider.
The above three packages respectively correspond to the APIs that the application depends on, the modules of the consumer-side application, and the modules of the server-side application. In actual deployment, it needs to be split into three projects, and the common dependency of the consumer and the service is the api module. Starting from simplicity, this tutorial will be developed in the same project to distinguish between multiple startup classes.
3. Add Maven dependencies
After initializing the project, we need to add Dubbo-related maven dependencies first.
Edit the pom.xml file and add the following configuration.
    <dependencies>
        <dependency>
            <groupId>org.apache.dubbo</groupId>
            <artifactId>dubbo</artifactId>
            <version>3.1.6</version>
        </dependency>

        <dependency>
            <groupId>org.springframework</groupId>
            <artifactId>spring-context</artifactId>
            <version>5.3.25</version>
        </dependency>

        <dependency>
            <groupId>org.apache.curator</groupId>
            <artifactId>curator-x-discovery</artifactId>
            <version>5.2.0</version>
        </dependency>
        <dependency>
            <groupId>org.apache.zookeeper</groupId>
            <artifactId>zookeeper</artifactId>
            <version>3.8.0</version>
        </dependency>
    </dependencies>
In this configuration, the dependencies of dubbo and zookeeper (and the corresponding connector curator) are defined.

After adding the above configuration, you can refresh dependencies through IDEA’s Maven - Reload All Maven Projects.
4. Define service interface
The service interface is a bridge between the consumer and the server in Dubbo.
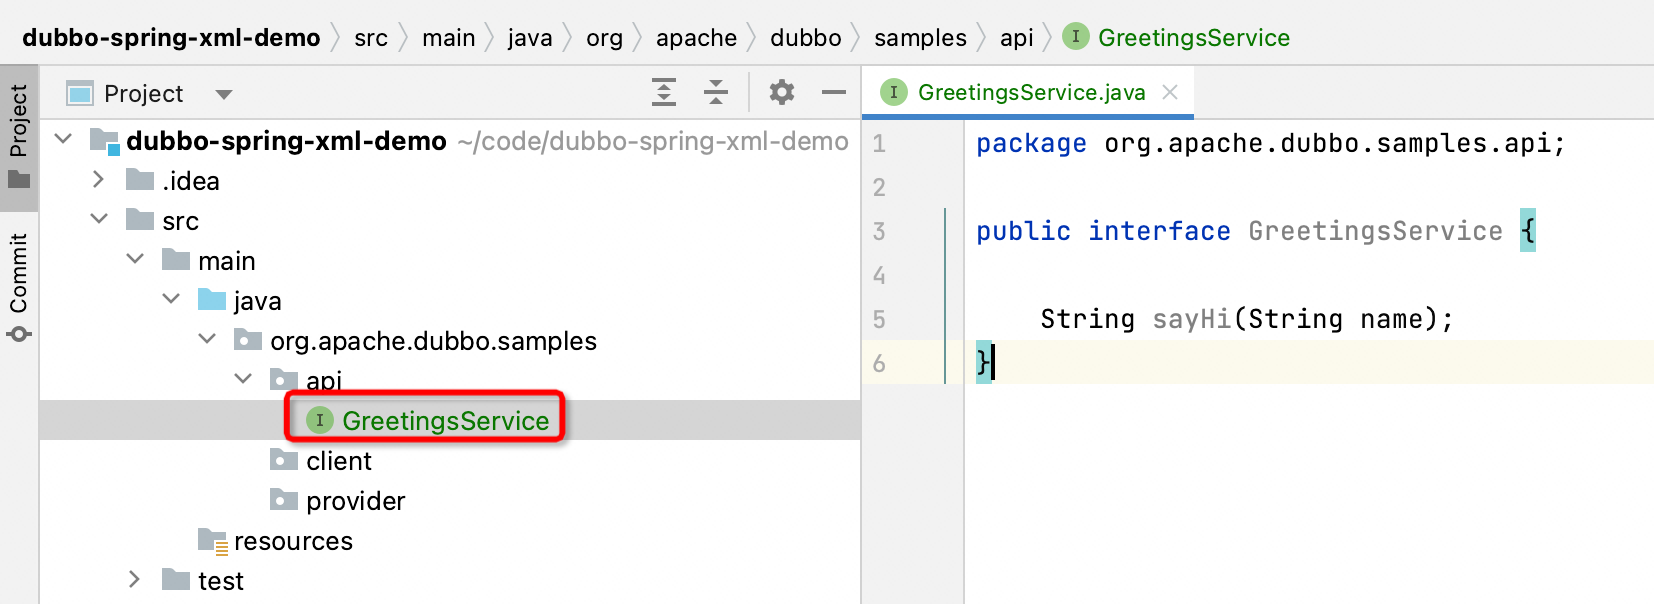
Create GreetingsService interface under org.apache.dubbo.samples.api, defined as follows:
package org.apache.dubbo.samples.api;

public interface GreetingsService {

    String sayHi(String name);
}
In GreetingsService, the sayHi method is defined. Subsequent services published by the server and services subscribed by the consumer are all developed around the GreetingsService interface.
5. Define the implementation of the server
After defining the service interface, you can define the corresponding implementation on the server side. Compared with the consumer side, this part of the implementation is a remote implementation, and there is no relevant information locally.

Create GreetingsServiceImpl class under org.apache.dubbo.samples.provider, defined as follows:
package org.apache.dubbo.samples.provider;

import org.apache.dubbo.samples.api.GreetingsService;

public class GreetingsServiceImpl implements GreetingsService {
    @Override
    public String sayHi(String name) {
        return "hi," + name;
    }
}
In GreetingsServiceImpl, implement GreetingsService interface, return hi, name for sayHi method.
6. Configure server-side XML configuration file
From this step to step 7, the information of Dubbo service will be configured through Spring XML.
First, let’s create a configuration file for the server.
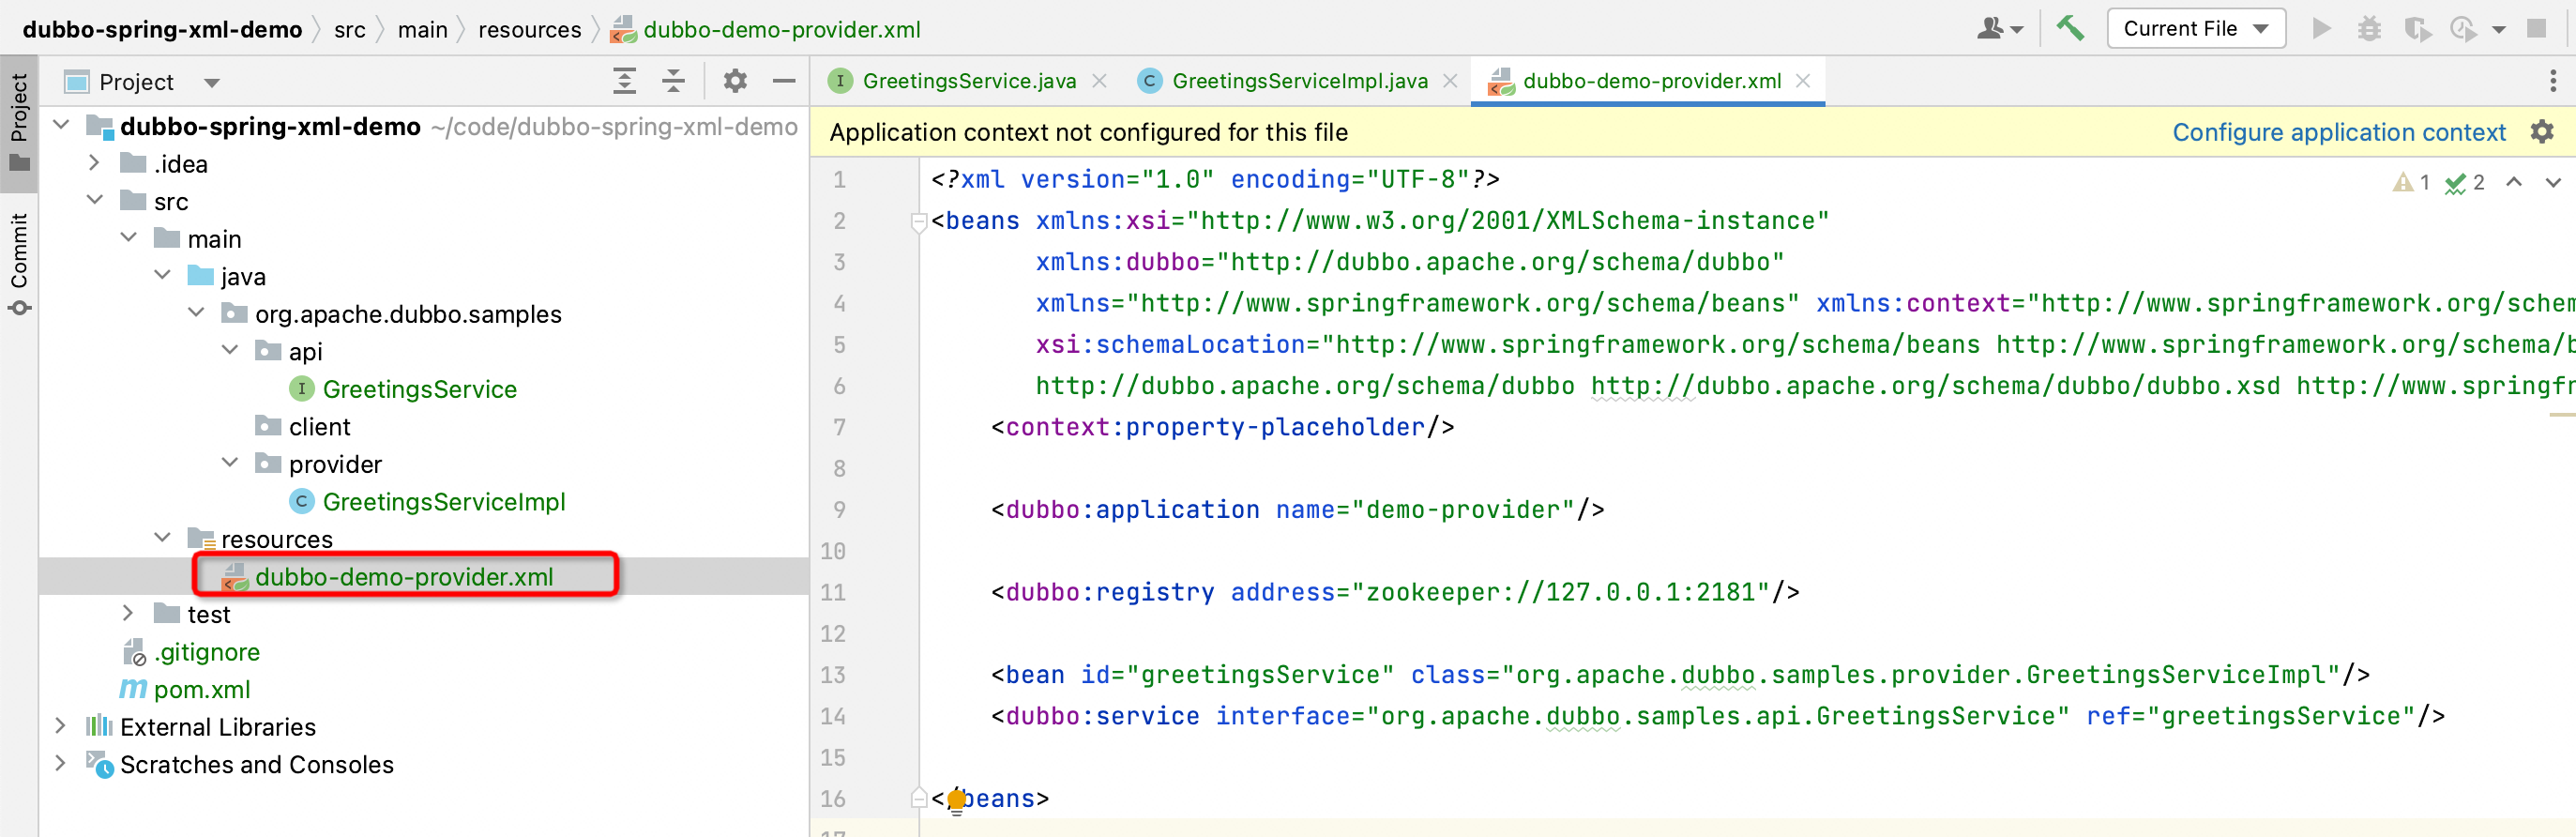
Create a dubbo-demo-provider.xml file under the resources resource folder, defined as follows:
<?xml version="1.0" encoding="UTF-8"?>
<beans xmlns:xsi="http://www.w3.org/2001/XMLSchema-instance"
       xmlns:dubbo="http://dubbo.apache.org/schema/dubbo"
       xmlns="http://www.springframework.org/schema/beans" xmlns:context="http://www.springframework.org/schema/context"
       xsi:schemaLocation="http://www.springframework.org/schema/beans http://www.springframework.org/schema/beans/spring-beans.xsd
       http://dubbo.apache.org/schema/dubbo http://dubbo.apache.org/schema/dubbo/dubbo.xsd http://www.springframework.org/schema/context http://www.springframework .org/schema/context/spring-context.xsd">
    <context:property-placeholder/>

    <!-- Define application name -->
    <dubbo:application name="demo-provider"/>

    <!-- Define the registration center address -->
    <dubbo:registry address="zookeeper://127.0.0.1:2181"/>

    <!-- Define the bean corresponding to the implementation class -->
    <bean id="greetingsService" class="org.apache.dubbo.samples.provider.GreetingsServiceImpl"/>
    <!-- Define service information, refer to the above bean -->
    <dubbo:service interface="org.apache.dubbo.samples.api.GreetingsService" ref="greetingsService"/>

</beans>
In this configuration file, the application name of Dubbo, the address of the registration center used by Dubbo, the spring bean for publishing the service, and the bean to be published through Dubbo are defined.
7. Configure the consumer XML configuration file
Similarly, we need to create a configuration file for the consumer.
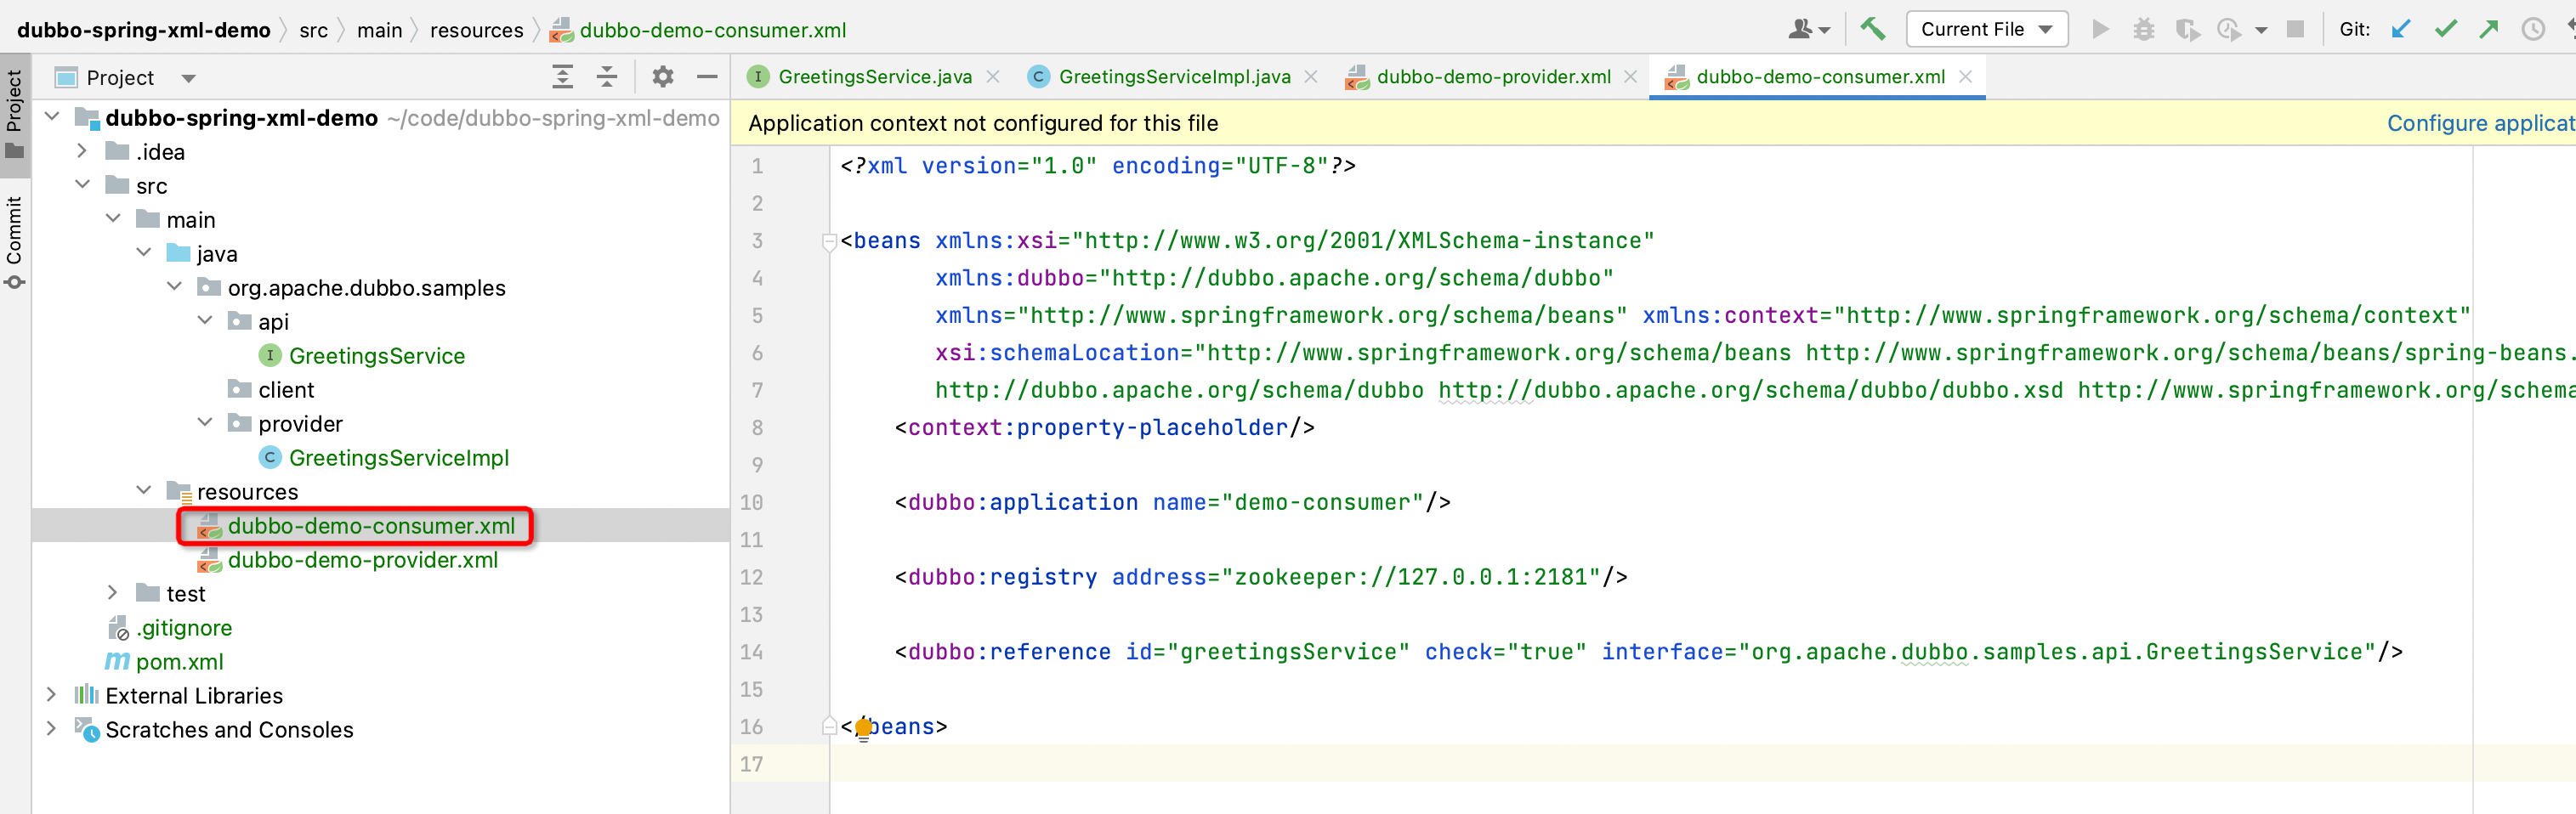
Create a dubbo-demo-consumer.xml file under the resources resource folder, defined as follows:
<?xml version="1.0" encoding="UTF-8"?>

<beans xmlns:xsi="http://www.w3.org/2001/XMLSchema-instance"
       xmlns:dubbo="http://dubbo.apache.org/schema/dubbo"
       xmlns="http://www.springframework.org/schema/beans" xmlns:context="http://www.springframework.org/schema/context"
       xsi:schemaLocation="http://www.springframework.org/schema/beans http://www.springframework.org/schema/beans/spring-beans.xsd
       http://dubbo.apache.org/schema/dubbo http://dubbo.apache.org/schema/dubbo/dubbo.xsd http://www.springframework.org/schema/context http://www.springframework .org/schema/context/spring-context.xsd">
    <context:property-placeholder/>

    <!-- Define application name -->
    <dubbo:application name="demo-provider"/>

    <!-- Define the registration center address -->
    <dubbo:registry address="zookeeper://127.0.0.1:2181"/>

    <!-- Define subscription information, Dubbo will create corresponding beans in Spring Context -->
    <dubbo:reference id="greetingsService" interface="org.apache.dubbo.samples.api.GreetingsService"/>

</beans>
In this configuration file, the Dubbo application name, the registry address used by Dubbo, and the subscribed service information are defined.
8. Configure the server startup class based on Spring
In addition to configuring the XML configuration file, we also need to create a Spring Context-based startup class.
First of all, we first create the startup class of the server.
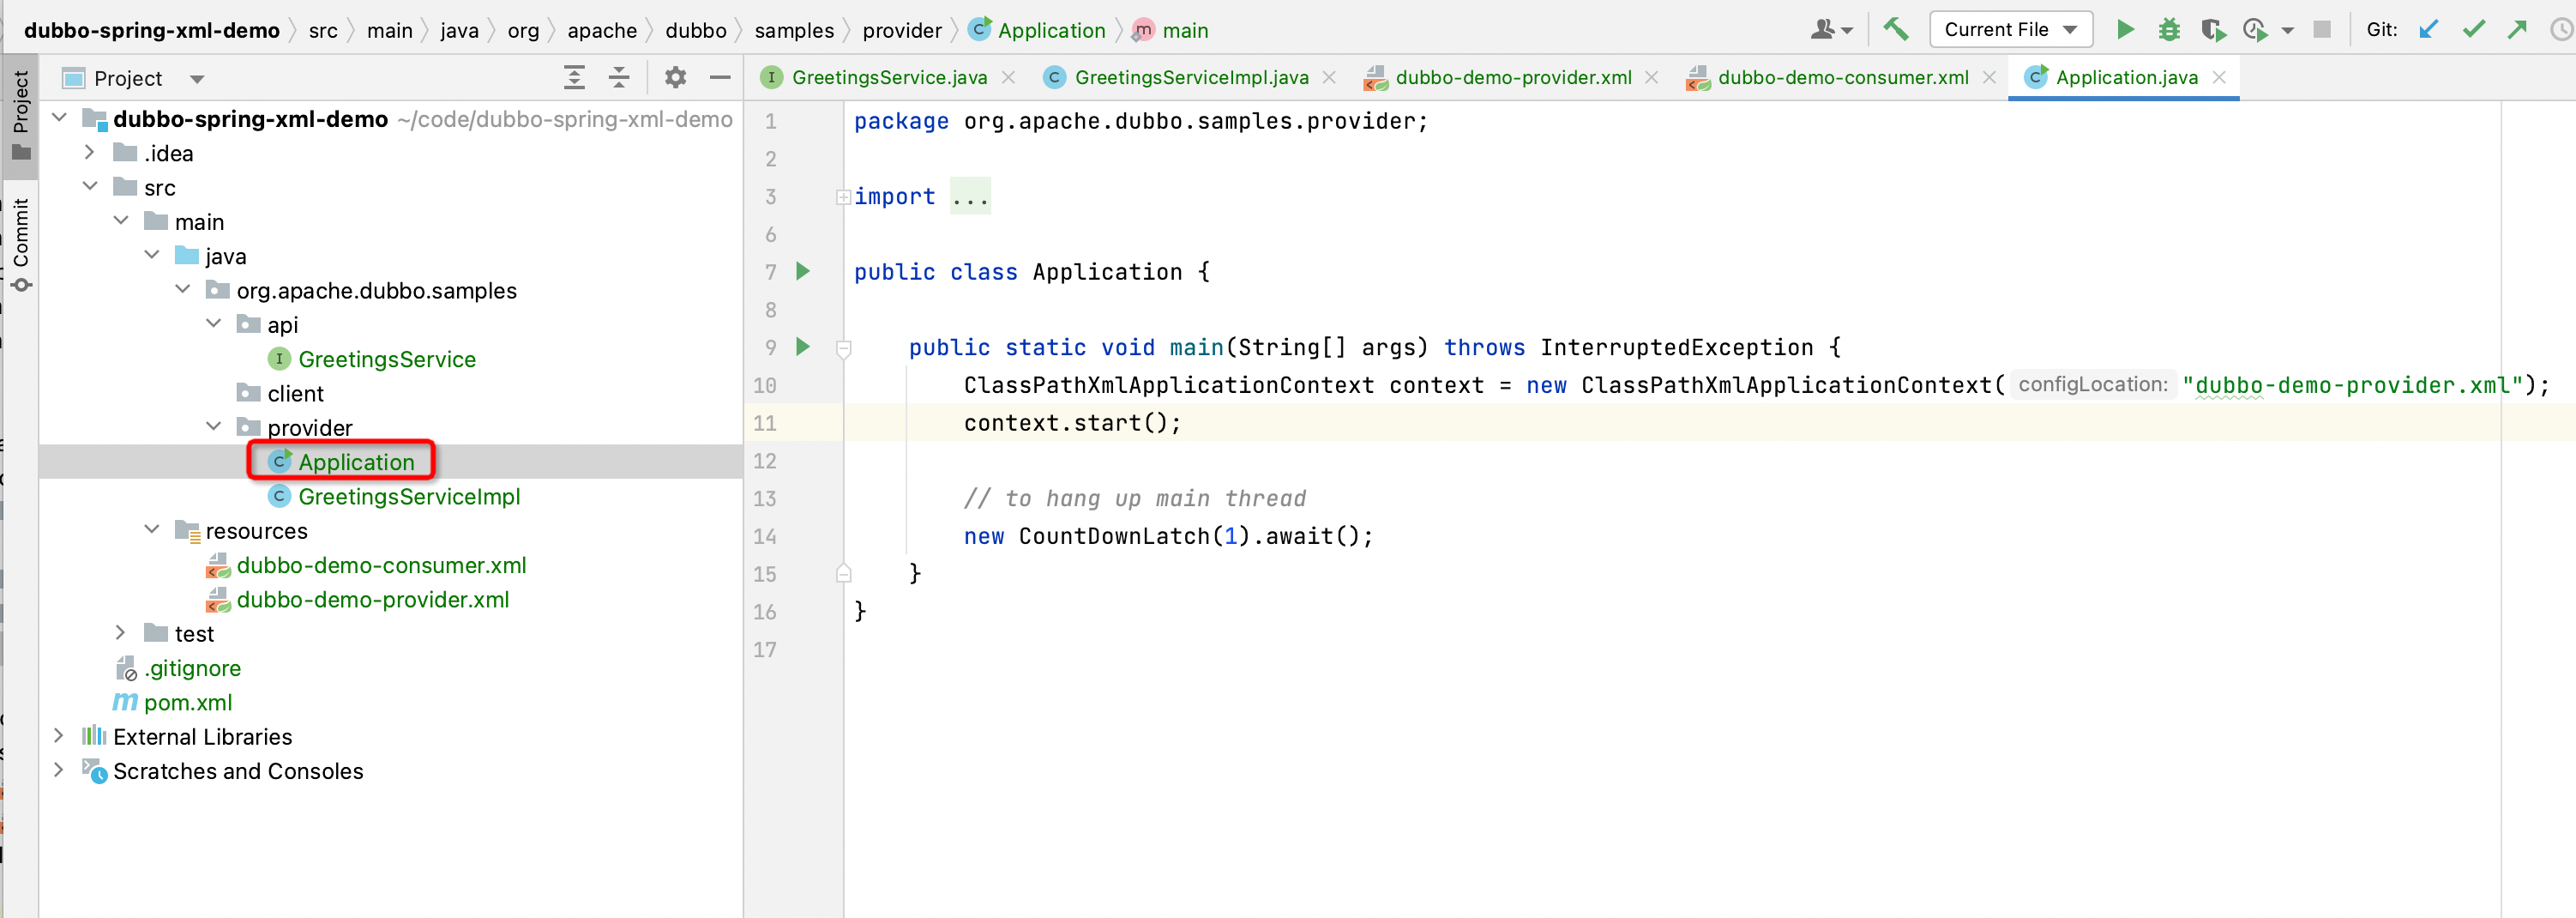
Create Application class under org.apache.dubbo.samples.provider, defined as follows:
package org.apache.dubbo.samples.provider;

import java.util.concurrent.CountDownLatch;

import org.springframework.context.support.ClassPathXmlApplicationContext;

public class Application {

    public static void main(String[] args) throws InterruptedException {
        ClassPathXmlApplicationContext context = new ClassPathXmlApplicationContext("dubbo-demo-provider.xml");
        context. start();

        // Suspend the main thread to prevent exit
        new CountDownLatch(1). await();
    }
}
In this startup class, a ClassPathXmlApplicationContext is configured to read the dubbo-demo-provider.xml configuration file defined in the previous step 6.
9. Configure consumer startup classes based on Spring
Similarly, we need to create a startup class for the consumer.
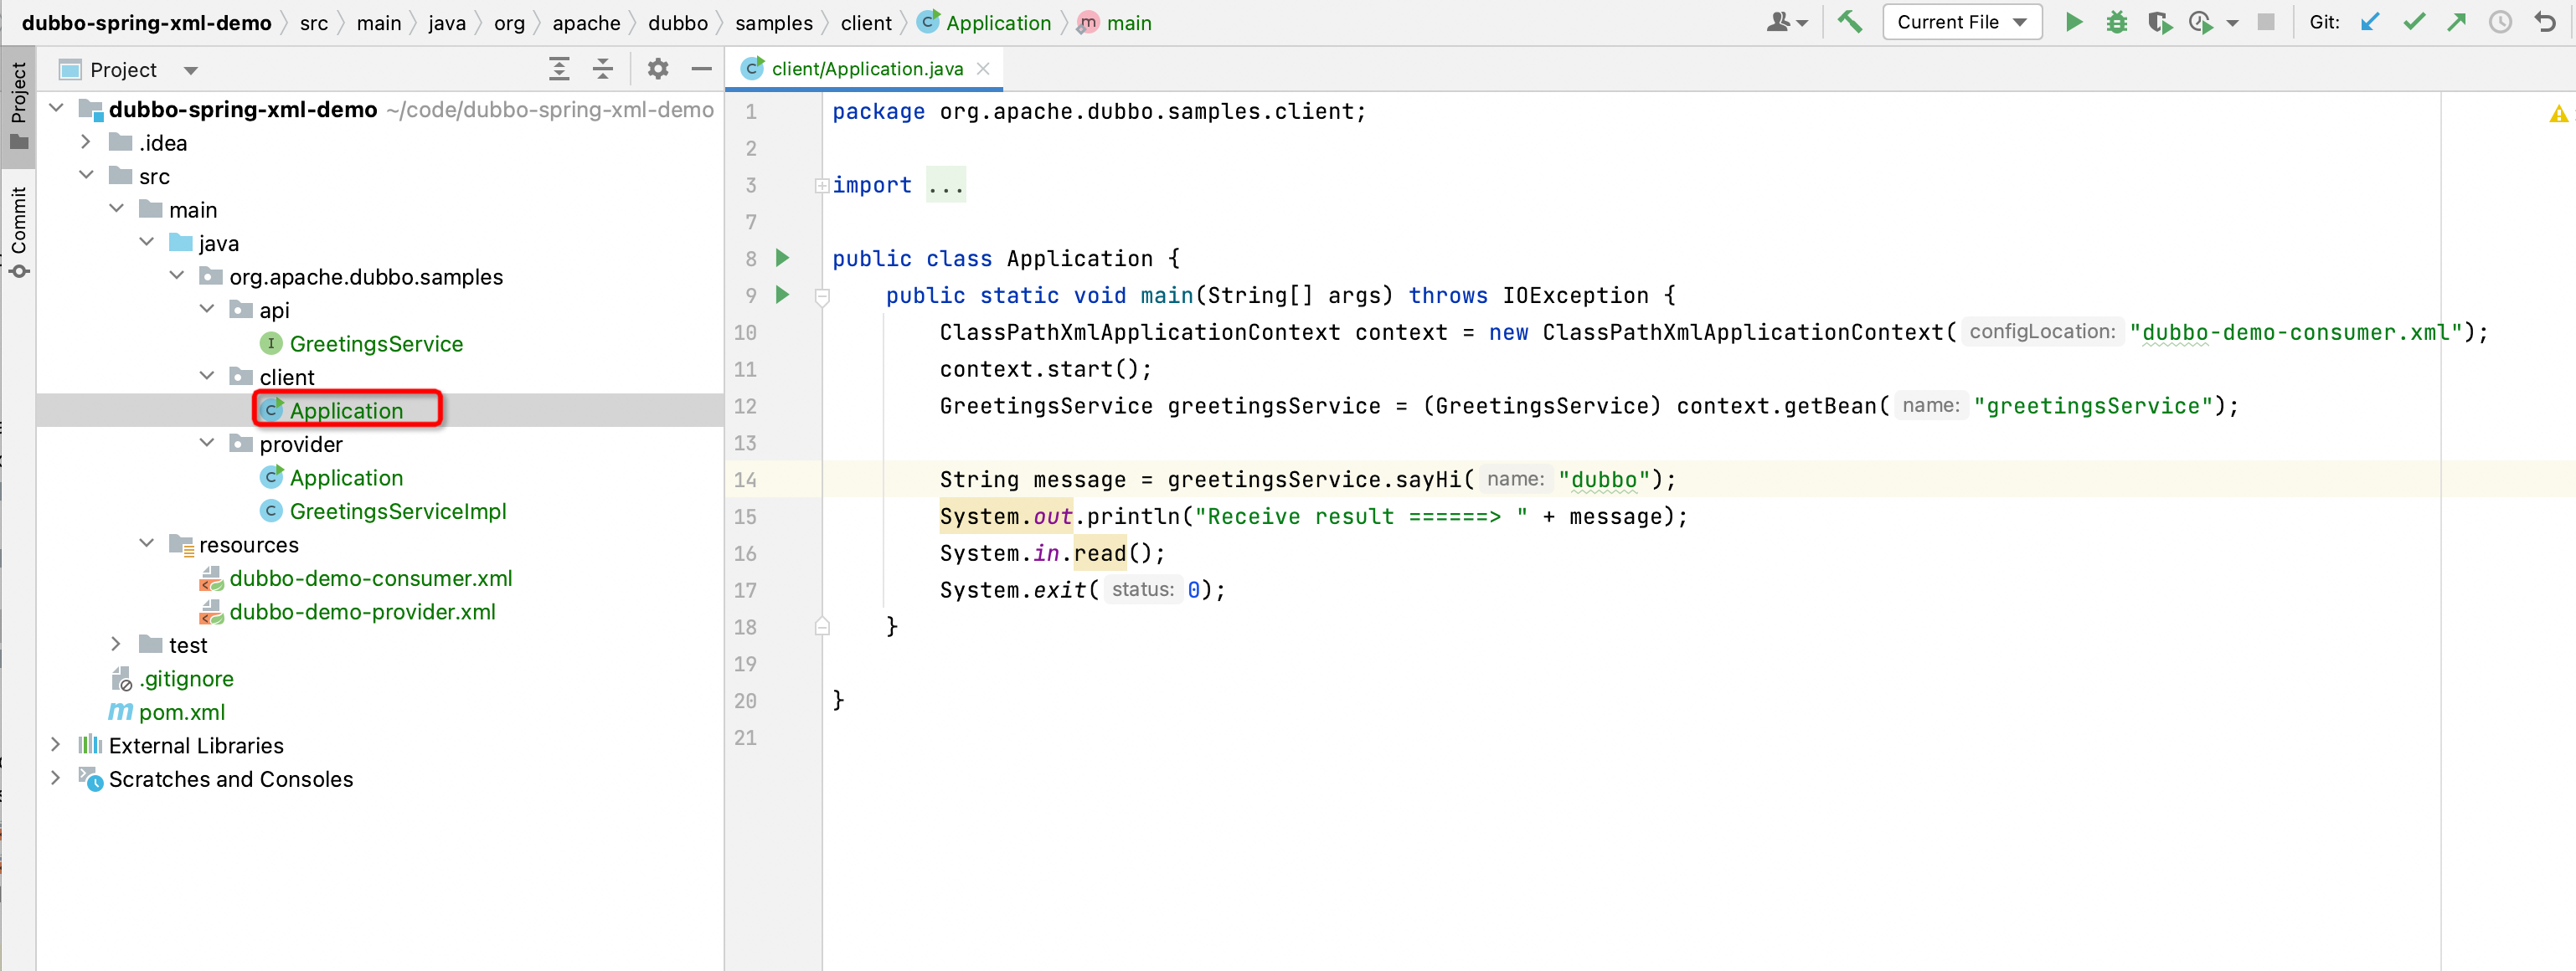
Create Application class under org.apache.dubbo.samples.client, defined as follows:
package org.apache.dubbo.samples.client;

import java.io.IOException;

import org.apache.dubbo.samples.api.GreetingsService;
import org.springframework.context.support.ClassPathXmlApplicationContext;

public class Application {
    public static void main(String[] args) throws IOException {
        ClassPathXmlApplicationContext context = new ClassPathXmlApplicationContext("dubbo-demo-consumer.xml");
        context. start();
        GreetingsService greetingsService = (GreetingsService) context. getBean("greetingsService");

        String message = greetingsService.sayHi("dubbo");
        System.out.println("Receive result ======> " + message);
        System.in.read();
        System. exit(0);
    }

}
In this startup class, three functions are mainly performed:
Configure a
ClassPathXmlApplicationContextto read thedubbo-demo-consumer.xmlconfiguration file defined in the previous step 7Obtain the bean created by Dubbo named
greetingsServicefrom the Spring ContextInitiate a call to the remote end through this bean
10. Start the application
As of step 9, the code has been developed, and this section will start the entire project and verify it.
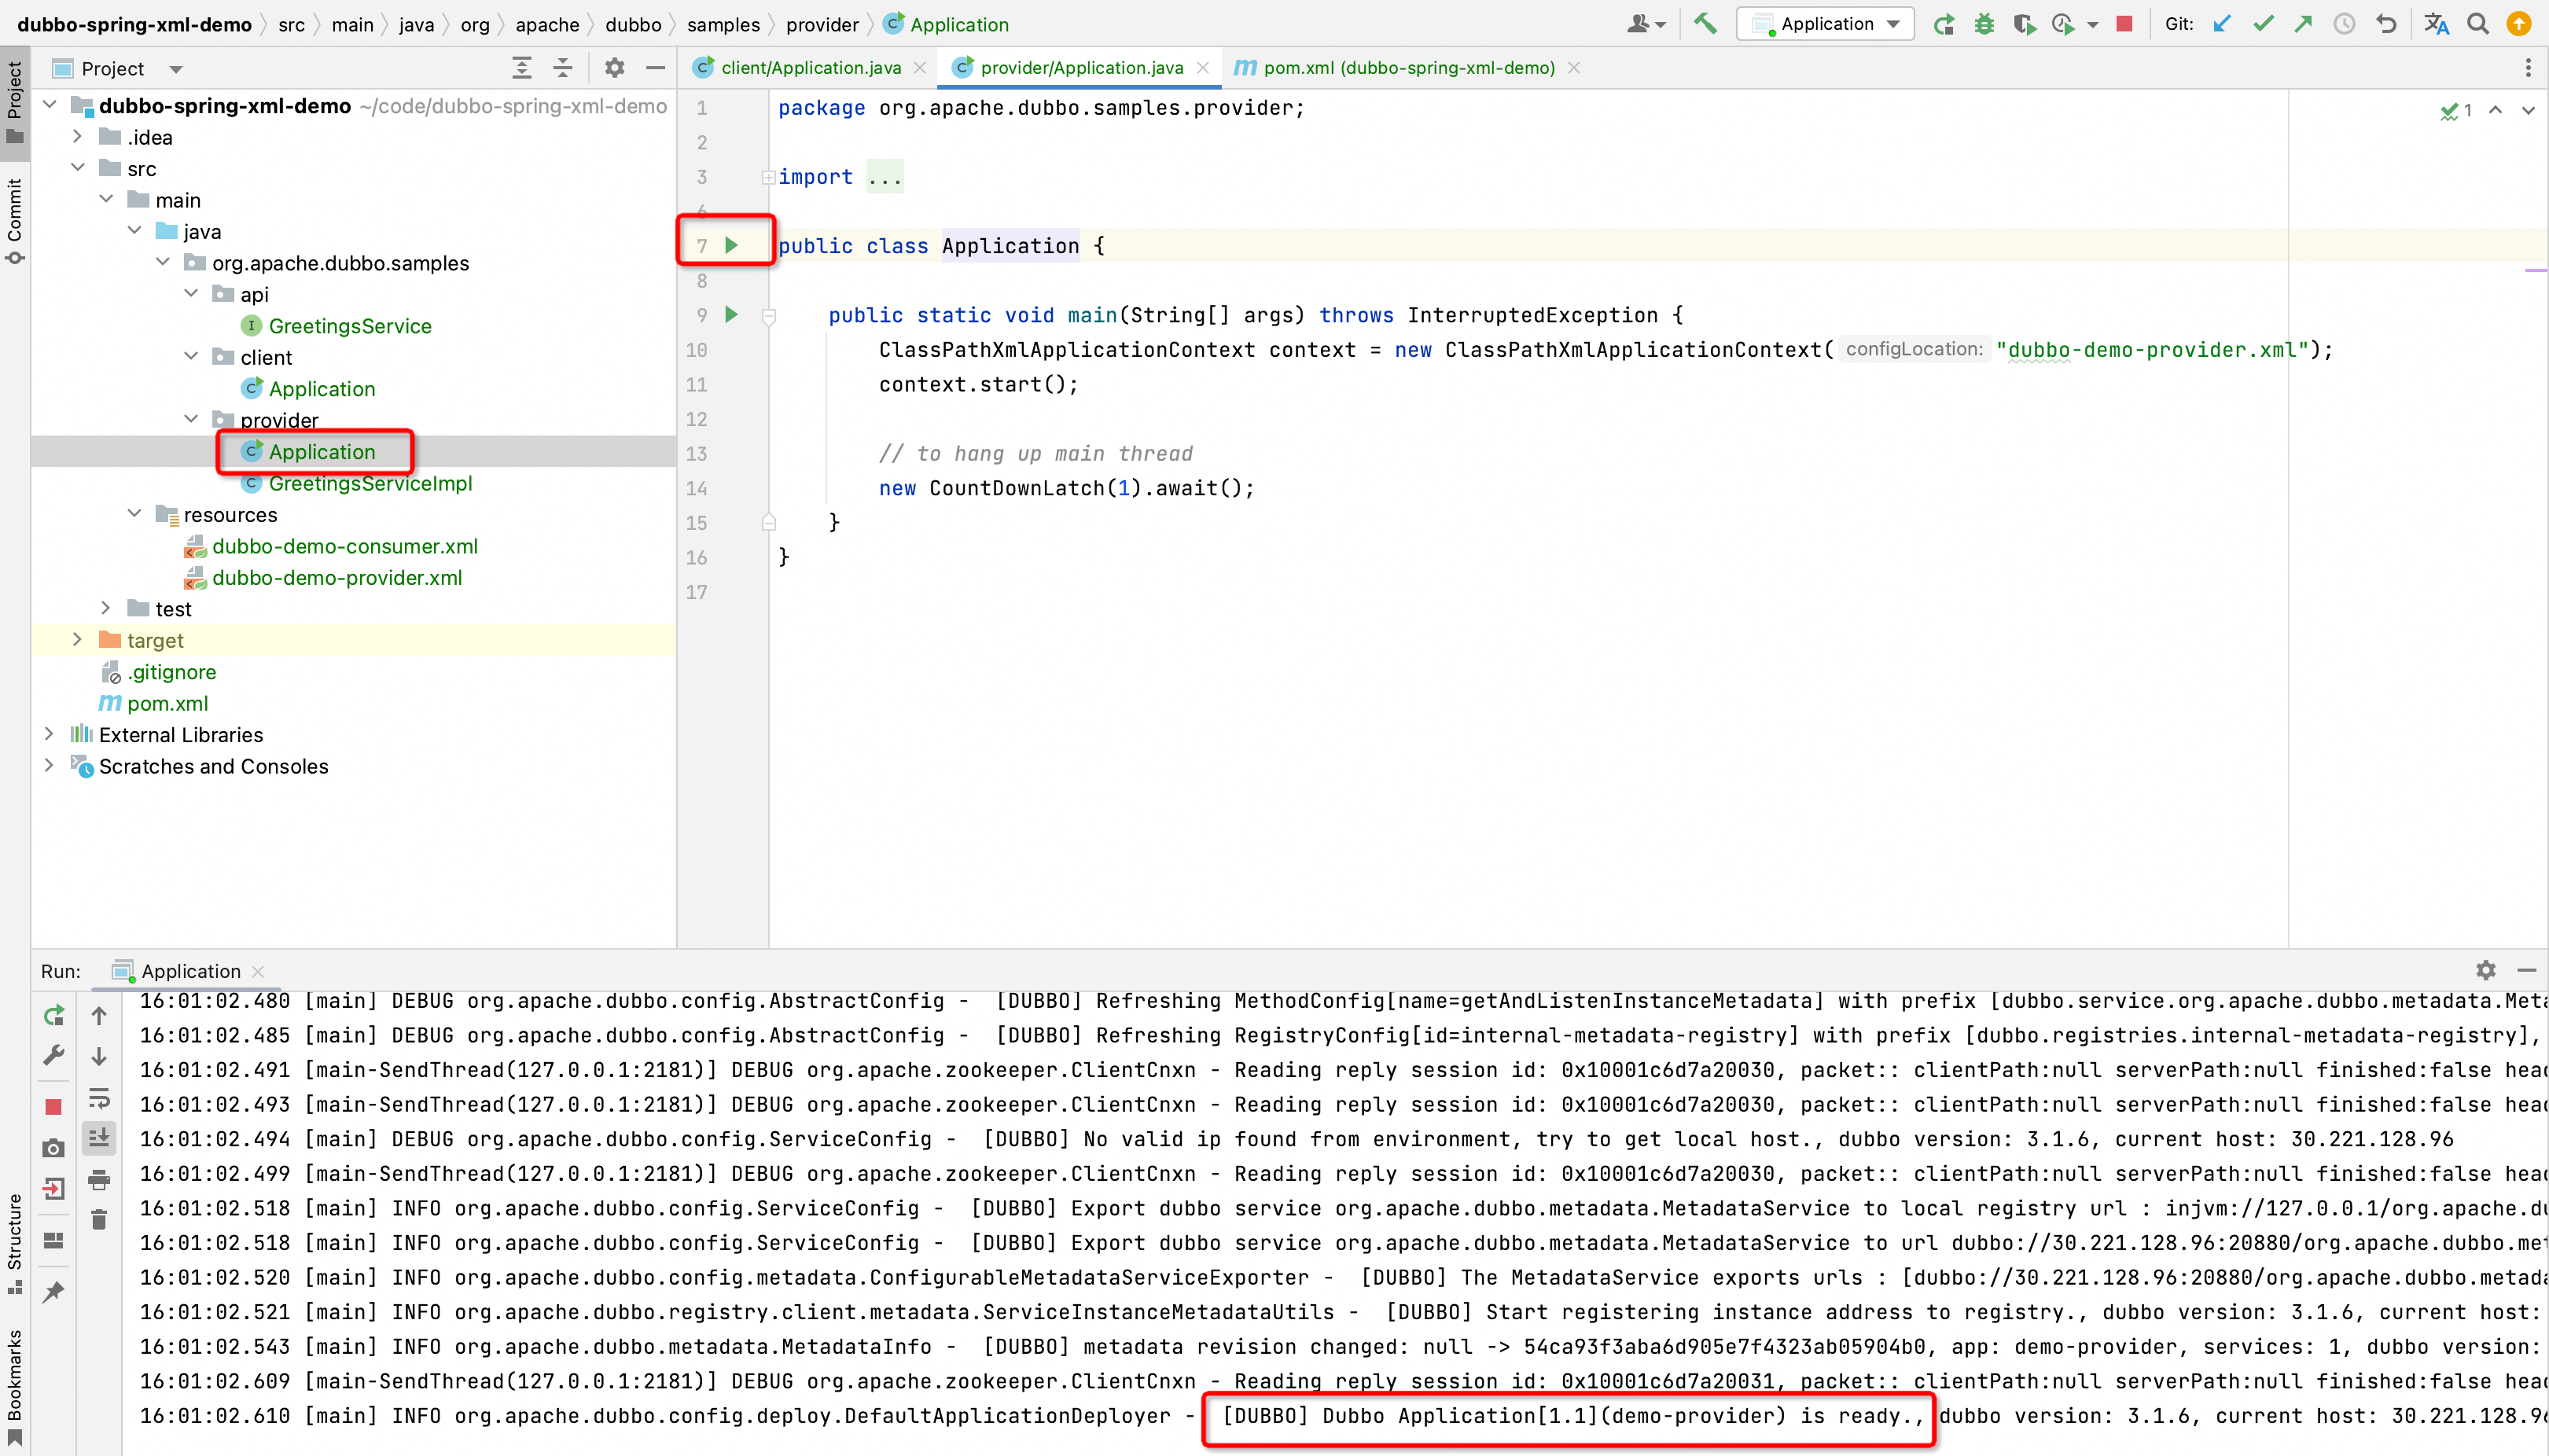
The first is to start org.apache.dubbo.samples.provider.Application, wait for a while to appear the log as shown in the figure below (Dubbo Application[1.1](demo-provider) is ready), which means that the service provider is started , which indicates that the service provider can provide services externally.
[DUBBO] Dubbo Application[1.1](demo-provider) is ready., dubbo version: 3.1.6, current host: 30.221.128.96
Then start org.apache.dubbo.samples.client.Application, and wait for a while to see the log (hi, dubbo) as shown in the figure below, which means that the service consumer is started and the call to the server is successfully obtained.
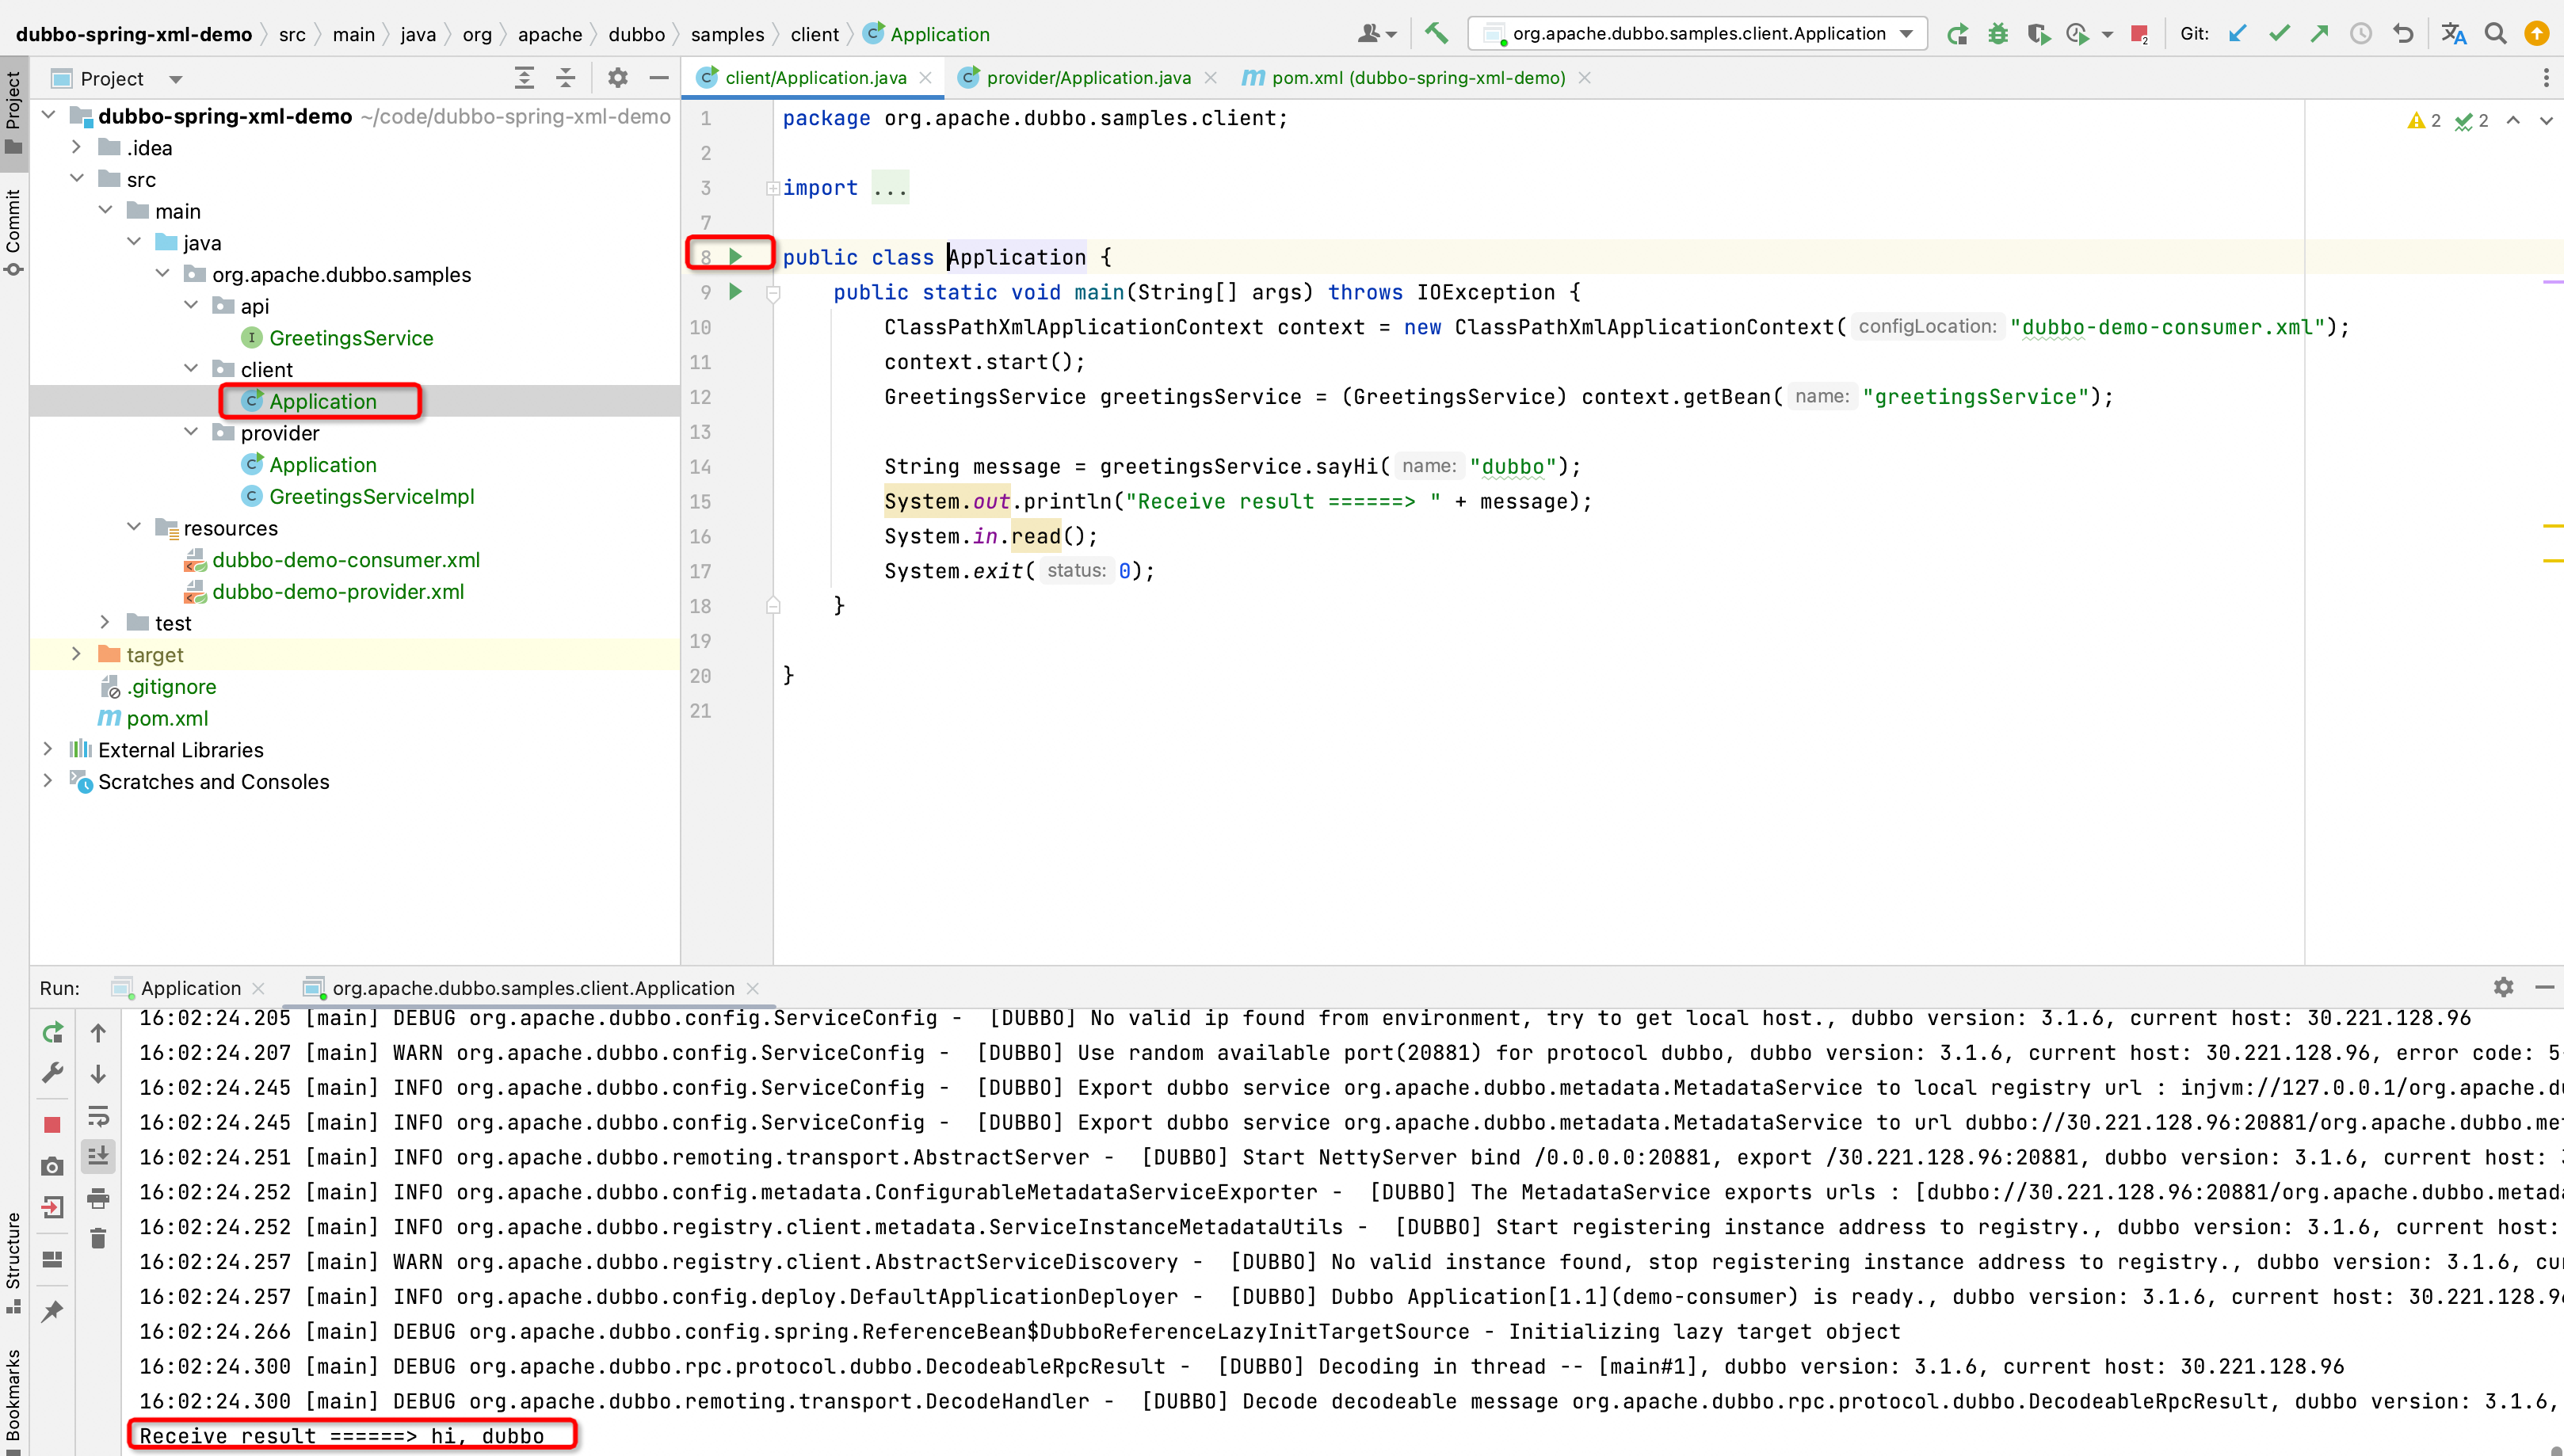
Receive result ======> hi, dubbo
Further reading
1. Dubbo XML configuration introduction
The main configuration entries of Dubbo include dubbo:application, dubbo:registry, dubbo:reference and dubbo:service, etc. For more details, please refer to [XML configuration | Apache Dubbo](/zh-cn/docs3- v2/java-sdk/reference-manual/config/xml/) article.
More
This tutorial introduces how to develop a microservice application based on Dubbo x Spring XML. So far, the three main startup methods of Dubbo based on API, Spring Boot and Spring XML have been introduced.
In the next section, the microservice development method based on Protobuf IDL configuration will be introduced.